
Last year before AEC Lab rolled into Voyansi, we wrote about applying the Pareto Principle to software problems. To summarize in case you missed it, we discussed the fact that organizations can make large impacts by solving the biggest problems first. In summation, correctly identifying your largest “stones” or issues is your challenge. Finding the stone that represents 20% of the causality but solves the 80% of your problems.
I'm a firm believer in leveraging this idea when creating training content. I'll start with my theory that in every discipline, some workflows allow you to accomplish more than others. For instance, in your personal life: if you can operate a mouse, keyboard, and web browser, you can do most things you need to do online such as paying your bills, watching a movie, or finding directions.
My BIM question for you is: What is the most basic skillset you can learn in Dynamo to accomplish most of the work you do day to day?
“Get” and “Set”.
Think about how far you can go with just these two commands...
Getting Started
If you have worked with Revit for a while, you should be familiar with 4 basic words:
- Categories
- Families
- Types
- Instances
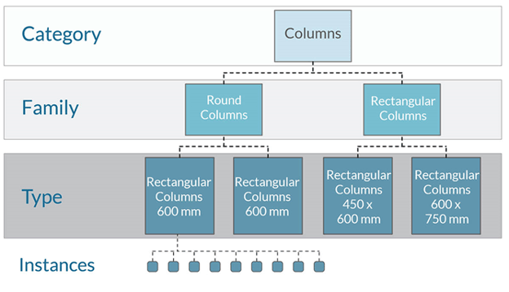
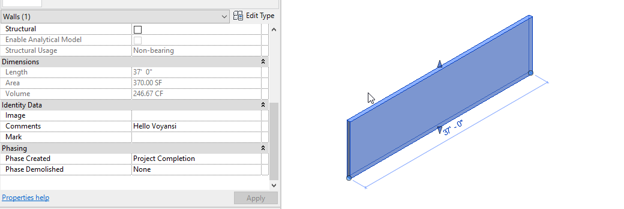
Every element has parameters that we could visualize from the user interface. On the properties bar, we could see Instances parameters. From the Type properties window, we can see Type Parameters.
We can consider both as characteristics associated with every Revit Element. These properties can be read and can be set. Of course, there are exceptions, some parameters just can be read. In fact, there are certain properties that you can access with the RevitAPI.
In the next section, we will focus on Dynamo as a product, we will explore some nodes and will give you an introduction about how to use them. No worries if you are not able to reproduce step by step. Practice makes perfect. The most important thing at this point is to understand how to think about the problem. If you achieve this, the next steps will be easy.
Getting started with Nodes
If this is your first time opening Dynamo, welcome! Before beginning, there are two basic elements you should review:
- Nodes
- Wires
Using the Select Model Element node, you will be able to pick some elements from the Revit User Interface.
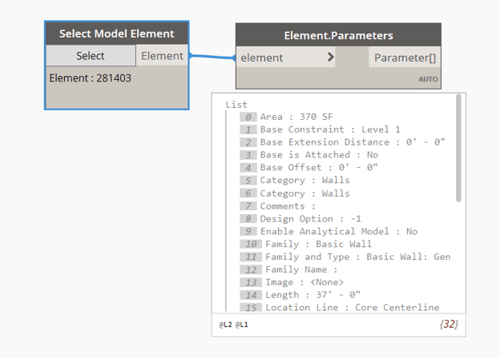
With Element Parameters nodes you will be able to see which properties elements have and their values. This is a good way to know the anatomy and the behavior that the elements in Revit have.
Concept #1: Get
Also, you can read these values without displaying a list like that. To do this, use the Element.GetParameterValueByName node.
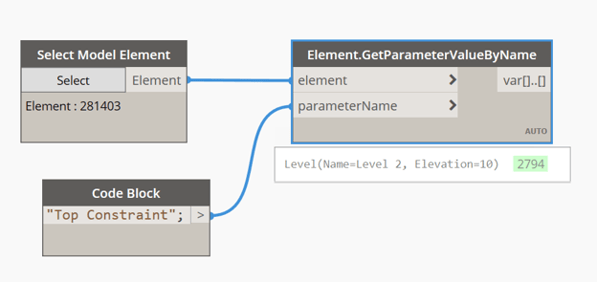 This node expects one or more elements and one parameter name to look for. If you write a name that does not exist as a parameter, you will receive nothing. If the name exists, you will receive the value you are expecting. For instance, in this sample, I selected a wall and you are able to receive the parameter “Top Constraint”. In turn, we receive a value, a level in this case.
Concept #2 Set
To set a value is almost the same formula: Select an element, set the Parameter name, and finally add the value you want to write.
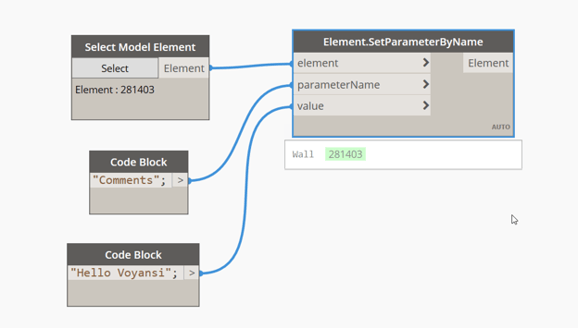 Now our wall has this value.
All of these have been a little bit obvious so far, I promise you it will be useful in a couple once tied together. The most important takeaway is to understand (or be able to find a good reference quickly) how every element works. I'm skipping steps here, but this is extremely important. How do Doors store Levels? Is it associated with the Type or with the Instance? Why do Walls have a different parameter name to store the same information?
Application #1: Filtering
Now that you have the basics down, let's apply some workflow concepts. Think about how you make decisions when you need to add values to Revit elements.
“I just look for the element and add the value that I need”
Well, there a couple of things are happening in the background. You select an element that you recognize for some attribute. This attribute could be the category, the id, the color, the shape. Whatever the characteristic may be, It is something you are able to recognize. Then you look for a parameter by name. Finally you copy down the value.
Any value? No. That value makes sense for some reason. Normally you make your decision based on certain conditions. You follow rules to determine certain values.
This rule could be complex or not. Maybe, you are reading an excel file that has listed the element by ID, and next to the element, there is a value. And that's it, copy and paste.
In my example, your rule would be “If the element has this number as id set this value”
That point is really where you will put your brain to think strategies or ways to find solutions.
Attempt #1
Let’s suppose you have to determine if the walls you have on your project are small, medium, and large in size.- First, we will define what we consider small, medium, and large.
- Small: walls with less than 50CF. - condition 3
- Medium: walls with more than 50CF but less than 150CF. - condition 2
- Large: walls with more than 150 CF. - condition 1
- Next, we will set the value on a Project parameter called “Size”. This is the workflow we will follow:
- Select walls.
- Read the Volume.
- Check if the volume is Small, Medium, or Large.
- Set value on size.
How do we write this rule? This rule will be a boolean expression, that can be evaluated as true or false. So we will ask if our volume is bigger than 150CF, smaller than 50CF or if it is in the middle.
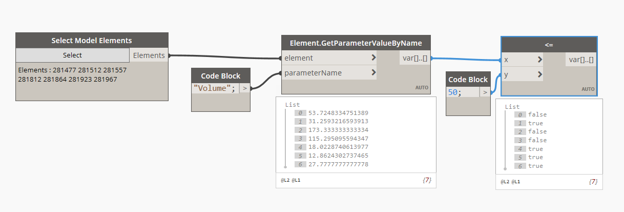
We can use logical operators to evaluate expressions. In this case, we are comparing 2 values and the nodes return the result of that operation. As you can see, the list of boolean values has the same number of elements as the one that has the volumes. Both lists contain 7 values. They are also ordered, so the first volume corresponds to the first boolean value. As 53 is bigger than 50 it returns false.
The next step is to filter the walls. The list of boolean values will be our mask. The mask will be used to separate those elements that match our condition from those which don’t.
To do this, we connect our boolean mask and out elements to the node Element.FilterByBoolMask
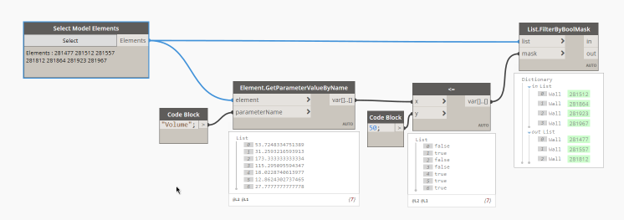
The node Element.FilterByBoolMask has 2 outputs: in and out.
In contains all elements that have matched with the mask, those that have the value True. That means the element volume is less or equal to 50. On the other hand, out contains those that don’t match.
We can continue filtering all elements that are in the output out. Let’s ask if the volume is bigger than 150CF. The rest of the elements (those that have not matched with either of condition 1 and condition 3) are in the middle, so they match with condition 2.
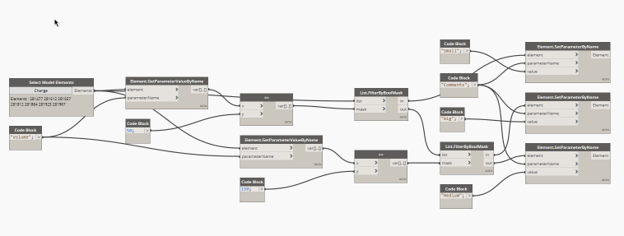 Our condition is based on a numerical value. But you could have other values as the Family Name (Text) or some Yes/No field.
That's it.
Seriously, if you understood this, you are 80% of the way there to fully leveraging Dynamo. I think it's so simple that a salesperson can learn to use the tool, so I'm challenging my colleague Mike Lee in Sales, to learn Dynamo.
Want to see for yourself? Join us for our upcoming workshop: Dynamo, so simple a sales person can do it.